
Pandigital Nova Rooting Directions
Overview
Below you will find rooting directions for the Pandigital Nova. The rooting process is ridiculously simple and only takes all of about 2 minutes to accomplish.
Installing Google apps and fixing the Android Market, however, is a little more tricky, so there's this second set of Android Market install directions for that. Follow these two sets of directions closely and you'll have the Android Market up and running on your Pandigital Nova in no time.
I'm not an expert and don't take credit for any of this work; all I did was follow these directions over at SlateDroid. I encountered a few bumps in the road so make sure to read all the steps before making the decision to root your Pandigital Nova.
Disclaimer/Forewarning
Rooting your Pandigital Nova comes with some risks. Unforeseen things can happen. In fact, one side effect I experienced after installing the Google apps pack is that my Nova started working really slowly to the point that it was unresponsive at times, and apps kept force-closing. I ended up doing a factory reset (the root and Google apps remained, plus all the Nova's regular apps) and everything has worked well since then, except my home button no longer works for some reason (it works now; here's the fix).
The point being: Use these directions at your own risk. I am not responsible if your Pandigital Nova turns up dead in an alleyway with singed wires and a fried motherboard, or if it goes on a rampage to take over the world.
Rooted Pandigital Nova Video Demo
Pandigital Nova Rooting Directions
1. Make sure to remove any previous firmware update packages from the Pandigital Nova's memory card and internal memory before beginning. Not doing this will result in step #3 failing.
2. Download this file and place it as is on the root of the Nova's microSD card: OpenNova-ROOT-Spz0-v.1.0.update.zip.
3. With the Nova powered off and the microSD card inserted with the downloaded file above, you now need to boot the Nova in recovery mode.
To boot in recovery, hold down the volume up button and the power button. Then release the power button when the screen turns on, but continue to hold the volume up key until the screen flashes and an Android update icon appears. It will then show a screen that looks like this:
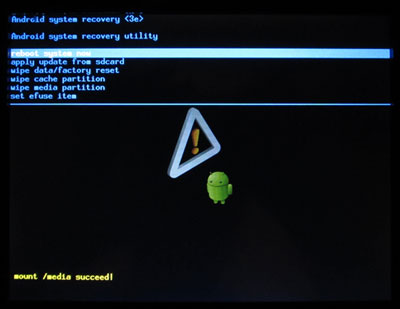
4. Use the volume up button to move from selections. Highlight "apply update from sdcard" and then press the volume down button to select it. Choose OpenNova-ROOT-Spz0-v.1.0.update.zip from the second list and then hit the volume down button to select again.
5. Once that's finished, it will return to the boot menu pictured above. Select reboot system now. That's it. Your Pandigital Nova is now rooted. You'll notice a Superuser app in the app drawer once it boots up again.
